Creating With Git

This repository and book serves as the instructional material and work template for the course “Creating With Git” on The Taggart Institute.
Copyright
Although this repository is open source and suggestions in the form of Pull Requests are welcome, this remains the intellectual property of The Taggart Institute, LLC, under the following license:

This work is licensed under a Creative Commons Attribution-NonCommercial-NoDerivatives 4.0 International License.
Setup
Codeberg Account and SSH Key
For our work in this course, you’ll need a Codeberg account. Sign up for one if you don’t have one; it’s free!
Why Codeberg? Why not GitHub? The original version of this course indeed used GitHub. However, more recent developments have convinced me to move this course to alternative Git forges.
To best use Codeberg the way we intend, we need to connect an SSH key to it. This will serve as our authentication method to Codeberg in the terminal.
If you know what an SSH key is and have one already, you can skip this part. For everyone else, let’s check if you do have one. In your terminal (on Linux and macOS), run the following command:
cat ~/.ssh/id_ed25519.pub
For Windows PowerShell users, you can run:
cat ~/_ssh/id_rsa.pub
At the time of this writing, Windows had yet to convert to using Ed25519 SSH keys. If they have by the time you read this, so much the better.
If you get output, that’s your SSH public key! That’s what we’ll need for the next step. If you didn’t get anything, then for all operating systems, you’re running:
ssh-keygen
For now you can just breeze through the process. Add a passphrase if you like, but make sure you remember it! Then run the appropriate cat command above to get the public key available for some copypasta.
Now, navigate to https://codeberg.org/user/settings/keys and click “Add key.”
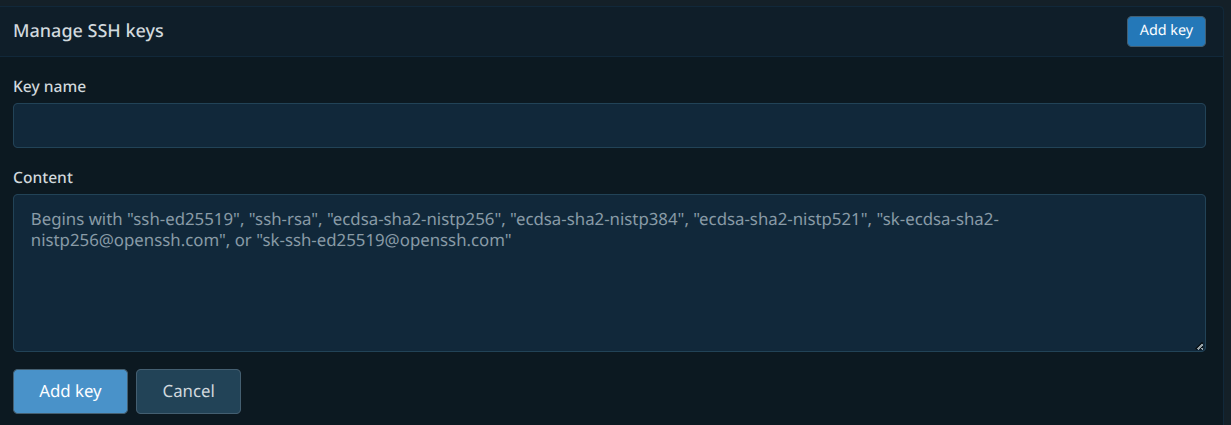
Name it whatever you like. I tend to name it after the computer I generated it on. Copy and paste the public key from the terminal into the “Key” text area and make sure the “Key type” remains “Authentication Key.”
Click the larger “Add key” button, and your account is all set to work correctly!
Get This Repo
As this is an instructional repo on the use of Git, we’ll be forking, then cloning this repo to use it.
Head over to, well, this. https://codeberg.org/The-Taggart-Institute/creating-with-git.
Fork the repo to your account with this button:
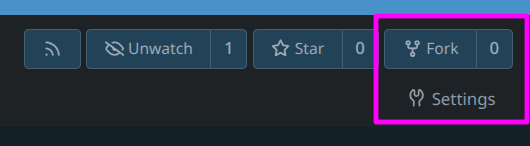
With your very own copy of the repo, clone it down by copying the URL and then heading over to your terminal and typing:
git clone git@codeberg.org:your-codeberg-account/creating-with-git.git
If you added a passphrase to your SSH key, you’ll be prompted for it. Type it in and press Enter, although you won’t see any visual confirmation of keystrokes.
We’ll learn more about what clone actually means later, but for now, hey! You have your very own copy of this repo. Get in there.
cd creating-with-git
Install Requirements
This project uses mdbook, which is a Rust binary. It can be installed either from binary releases, or via cargo if you have the Rust toolchain installed.
cargo install mdbook
You can then use mdbook to launch a development web server.
mdbook serve
That should launch local web server that serves up the website version of this repo on http://localhost:3000. Check it out!
Usage
As you go through the course, use the material here as supplemental reading, as well as a starting point for your own documentation. At several points, you’ll find parts that you’ll be asked to fill in to complete your very own resource for Git documentation! As you do, make commits with your own changes, and consider publishing them for yourself!
1-1: The Project
I know you’re here to learn about Git, so you might have expected a whole folder worth of code—Python maybe, or JavaScript. But all you’ll find in here is text in Markdown files. That’s because Git is about much more than just code. It’s a way to manage any project based around files that changes over time. It’s a way to manage those changes, explore possible alternate versions, and easily collaborate with your team.
There’s nothing about Git that is necessarily specific to programming projects. Anything that is mostly about text can be managed with Git. So we’re going to make ourselves a book—a book that can be published as a PDF, an eBook, or a website. This book will be about Git itself, but yours can be about whatever you like.
Every organization, every team…heck, every person, struggles with documenting their processes and procedures. The bigger the organization, the bigger the struggle. That’s why a method of easily producing and maintaining documentation is so valuable. Learning Git (and Markdown, while we’re at it) will empower you to produce documentation you know can be maintained for years.
Goals
When considering a documentation platform, we need it to be:
- Easy to update
- Easy to read
- Easy to search
MDBook and Markdown fit the bill here.
Why Markdown? Why MDBook?
With a project structure built entirely on plaintext files, we don’t need to worry about losing the data to some proprietary platform that someday we’ll need to migrate from. Text is not beholden to licensing. Even if someday MDBook stops working, the site/book you make with the code will continue to function, and using the text files with any other generating tool will be simple.
Project management products have come and gone. You know what has stood the test of time? HTML. That’s why I’m putting my documentation in it.
But in the meantime, MDBook is a very simple way to produce searchable, readable documentation in multiple formats. Web is the primary target, but the same source documents can produce PDFs or EPUB ebooks as well.
Learning Markdown
Reading this documentation’s source will give you a solid overview of Markdown syntax. MDBook will handle the conversion to HTML. If you want to learn more about Markdown syntax, check out Commonmark.
Check For Understanding
Using Markdown, create a list of goals for your own set of documentation. It can be about absolutely anything. Honestly, if I weren’t trying to sound professional, I’d probably make this whole thing about the evolution of Star Trek starship design. You do you—but do it in Markdown!
1-2: Git Repositories
We’ve used the term “repo” or “repository” a number of times already. But what is a Git repo?
Simply, it’s a folder with a hidden .git folder inside of it that manages versions and changes of the contents.
More nerdily, it’s a folder turned into a TARDIS: it contains more than it looks like, and it can travel in time and between possible realities.

Creating Git Repos
Let’s start from the assumption that you have Git installed. On the command line, run git --version to make sure.
While we’re at it, let’s configure Git for our usage. We need to tell Git who we are, so our changes (commits) can be labeled. We do so by providing a username and an email address.
git config --global user.name=username
git config --global user.email=user@domain.com
The username and email don’t have to match your Codeberg account, but it’s not a bad idea.
With that out of the way, let’s make a new folder outside of this repository. We’ll use this folder as a sort of laboratory for Git experiments. Then we can take what we’ve learned and apply it to the Checks for Understanding in this repo.
mkdir gitdemo
cd gitdemo
git init -b main
Note: The -b main isn’t strictly necessary, but we do it to make the name of our default branch “main” instead of the built-in “master.” Lots of folks are uncomfortable with that language, and it’s easy to fix.
git init initializes a Git repo in the current folders. It won’t seem like much occurred after you run this command, but just under the surface, quite a bit has taken place. Run ls -al and you’ll see a hidden .git folder. Listing those contents will result in something like this:
total 40
drwxrwxr-x 7 user user 4096 Feb 26 15:03 .
drwxrwxr-x 3 user user 4096 Feb 26 15:03 ..
drwxrwxr-x 2 user user 4096 Feb 26 15:03 branches
-rw-rw-r-- 1 user user   92 Feb 26 15:03 config
-rw-rw-r-- 1 user user   73 Feb 26 15:03 description
-rw-rw-r-- 1 user user   21 Feb 26 15:03 HEAD
drwxrwxr-x 2 user user 4096 Feb 26 15:03 hooks
drwxrwxr-x 2 user user 4096 Feb 26 15:03 info
drwxrwxr-x 4 user user 4096 Feb 26 15:03 objects
drwxrwxr-x 4 user user 4096 Feb 26 15:03 refs
You’re looking at what makes a Git repo a Git repo. You do not have to understand what each file and directory in .git does, but it helps to understand that this folder contains the Git magic. In fact, if you deleted all the files in a repo except for the .git folder, you’d still be able to reconstruct the files from the last commit!
Before we move on to make our first commit, let’s quickly look at the contents of the .git/config file.
[core]
	repositoryformatversion = 0
	filemode = true
	bare = false
	logallrefupdates = true
Now for comparison, check this repo’s .git/config file. You may be able to see why this file is so important.
Let’s move on to the basic workflow in Git, or the “core loop.”
The Git Core Loop
Let’s define it right up top:
- Create
- Stage
- Commit
When working on a project in a Git repository, we begin by creating the content we want. This could be new files or edits to existing files—even deletions of files. Once creation is finished for a specific goal, like a new feature, chapter, or a bugfix, we stage the changes—selecting what will be included in this chapter of the project’s history. Finally, we commit the changes to the timeline with a message to the future about whatever it was we did in this set of changes.
A Useful Metaphor
I like to use the space shuttle as a metaphor for the steps of the Git Core Loop.
Create: The VAB

The Vehicle Assembly Building is where the components of a shuttle launch were combined: liquid fuel tank, solid rocket boosters, and the shuttle itself.

This is equivalent to making the changes that are part of a commit.
Stage: The Crawler
The Mobile Launch Platform, colloquially known as “The Crawler,” moved the assembled shuttle from the VAB to the launchpad. This process took days—hopefully our commits won’t!

This is where we stage our changes for commit, but don’t yet enter them into history.
Liftoff

Let’s light this candle! The shuttle’s main engines and solid rocket boosters power it into low earth orbit.
This is where we commit our changes to history.
I’ll stop here before completely overextending this metaphor. Hopefully it’s helpful. But now, let’s actually do some work.
Our First Commit
Let’s head on over to our gitdemo folder/repo to do some work.
To start, let’s create a new file by outputting text via the terminal:
echo "My first commit!" > file1.txt
And now, it’s time for our first (and arguably most important) Git command:
git status
Your output should look something like this:
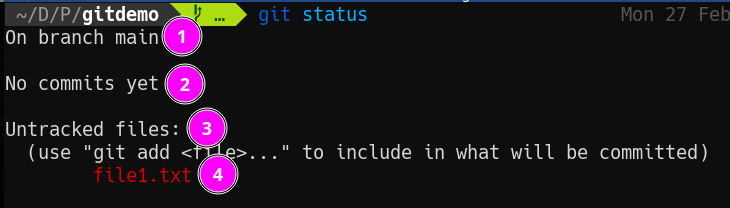
- Git tells us what branch we’re on (more on branches later).
- This won’t be here for long, but Git now tells us we haven’t made any commits.
- We do however have untracked files—files Git has no idea about.
- Here are those files.
As the command suggests, let’s run git add file1.txt to add the file, and run git status again.
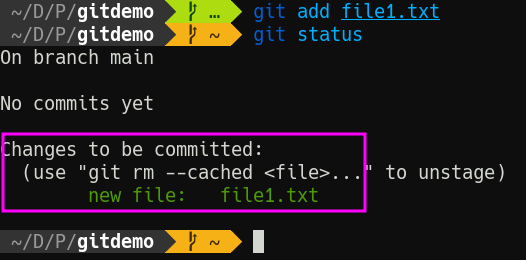
Now Git tells us we have changes “to be committed.” Put another, we have staged changes. Put yet another way, we have rolled the shuttle out to the launchpad.
We are go for launch. Run git commit and don’t freak out at what happens.
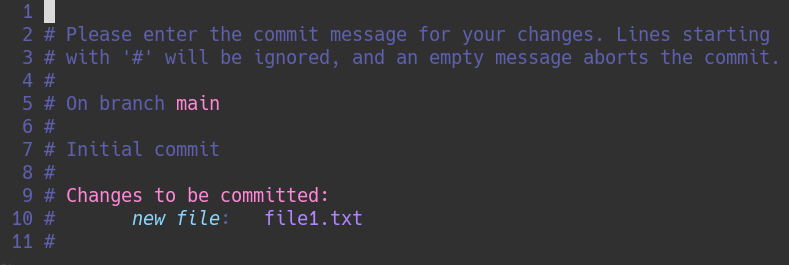
A text editor (whichever one is defined in the $EDITOR environment variable) pops up. For me, it’s Vim. For you, it may be Nano. This is the long-form way of writing commit messages, where we briefly describe what we did. In this case, we might consider a simple note like “Add file1.txt”. Write that message, and then save/quit from the editor.
Then, run git status one more time.
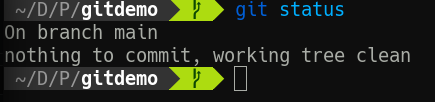
We have made history! It might not seem momentous, but the timeline of our repo has begun. Run git log to see it in all its glory.
commit 0581a2b2cb2ec73d92809e25457d6ae5fd6d3060 (HEAD -> main)
Author: Michael Taggart <mtaggart@taggart-tech.com>
Date:   Mon Feb 27 00:01:19 2023 -0800

    Add file1.txt
Now, your log won’t look exactly like this one, but it will have the same parts. In order:
- A unique commit hash and a reference that links the commit to a branch, and marks it as the most recent commit (
HEAD) - Author information
- A timestamp
- The commit message
There are other ways to view the log and we’ll explore them soon. For now, just know that this is how we can see exactly what has taken place in our project’s history.
Our Second Commit
The first commit is cool, but the second commit? That’s when the good stuff happens. Let’s make another change.
echo "My second commit!" >> file1.txt
Let’s see that git status now.
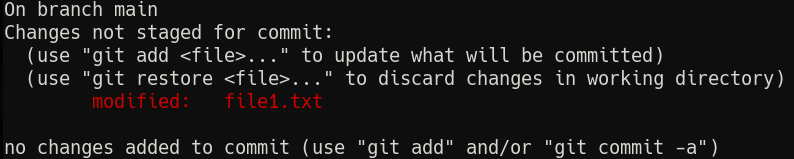
Before we make our next commit, let’s review the changes so far in detail. git diff, or git diff <file> will tell us exactly what’s changed since the last commit. Try git diff file1.txt.
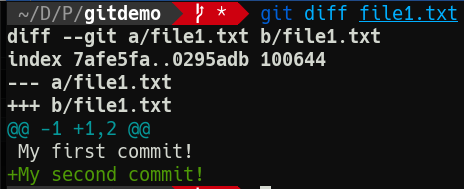
Git is telling us a new line has been added since the last commit. Which, yeah, it has. This is obviously a very simple change, but I find it handy to use git diff to check just what’s changed before I make the commit. That helps shape the commit message.
Let’s stage that change one more time with git add file1.txt.
Speaking of commit messages, let’s try a slightly quicker method for this one. By passing the -m option and a message, we can avoid entering the text editor for the commit message.
git commit -m "Add second line to file1"
Notice what Git tells us after this:
[main d9e8f3e] Add second line to file1
 1 file changed, 1 insertion(+)
The “insertion” is Git recognizing that the file has changed by way of addition.
Viewing History
With two commits under our belt, let’s view our history so far with git log.
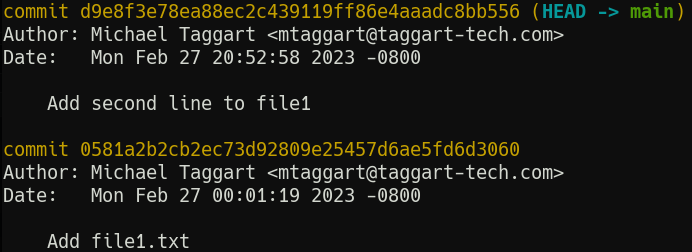
You’re probably wondering about that glob of letters and numbers.
When Git makes a commit, it takes the content, adds a special header, and creates a SHA-1 hash. This hash becomes the “id” of the commit. We’ll use these more later; what’s important now is that they are unique to each commit.
Each commit has author information (remember those git config --global commands?), as well as a timestamp and, of course, the commit message.
You can see an abbreviated version of the log with git log --oneline.
Now that we’re familiar with the Git Core Loop, in the next lesson we’ll review some best practices for commits.
Check For Understanding
In your own words, describe the Git Core Loop.
1-4: Commit Best Practices
At first, it’s tempting to think of commits like saving your work: do it frequently so that you never risk losing anything. I get that, but I urge you to resist that instinct.
Your commit history is the story of your project. How do you want it to read? Personally, I would want clear events that tell the story of how the project evolved. Not every commit has to be an epic moment, but they should be, whenever possible, distinct accomplishments.
Right now our gitdemo project is pretty small, so that can be difficult to simulate. Still, let’s give it a go. Start by adding a second file.
echo "This is the second file!1" > file2.txt
git add file2.txt
git commit -m "Add second file"
That’s not a typo in the first command. Well it is, but it’s intentional. We’ve committed a mistake. Now our objective should be to fix it. Use whatever text editor you like to remove the 1 from the end of file2.txt.
The next step in our project’s life is to fix the mistake. Bugfixes are important commits and should be isolated as much as possible. Don’t lump them in with other changes—at some point you’ll want to know when a fix was introduced, and it’ll be much easier if it is by itself.
For this commit, we’ll learn another shortcut. You can add/commit with one move by adding -a to git commit, like so:
git commit -am "Fix file2 typo"
This will add all unstaged changes at once, so be careful! Only use this when you know for sure that you want to commit every change you’ve made.
What Makes a Good Commit Message?
Although Git opens the full text editor for you, suggesting you write a short story about the commit, I don’t think that’s correct. A short sentence or phrase that begins with the action taken is appropriate. “Add section on good commit messages” might be a solid one for this section of the text. The reader quickly knows what changed and how.
There are other places to add more detail, some of which we’ll discuss later. For now, there is a little-known Git feature to add more detail about a commit afterward and separately: Notes.
Git Notes
Git Notes are not exactly a secret feature, but since Codeberg doesn’t show them, they might as well be. They allow additional context to commits. Think of them as accessories to commits—stored separately, but related.
To add a note, run git notes add. This will bring up the text editor, allowing you to write whatever you like.
By default, the note will be added to the most recent commit.
Run git log to see how the note adds to the commit message.
Wanna makes changes to the current note? git notes edit will bring the editor back up!
If you want to add notes for another commit, use git notes add <commit ID>.
git notes remove works as you’d expect, and can also accept a commit ID.
Check For Understanding
Makes some changes to your files, then commit the changes. Then, add a log to both the current commit and the previous commit!
1-5: Fixing Mistakes, Pt. 1
So far our commits have been nice a linear, with no mistakes. But a quick look at GitHub Commits will tell you that’s not always the case.
So let’s get into some trouble and learn how to get out of it. We’ll begin by creating a file and committing it, even though we don’t actually want it.
echo "I shouldn't be here!" > mistake.txt
git add mistake.txt
git commit -m "Add a mistake"
Removing Files
So of course this is a bit contrived, but it’s not uncommon to decide we no longer want a file in our repo. If we simply rm the file, Git will notice the file’s gone, but you’ll still awkwardly have to git add the now-missing file.
It’s more appropriate in these situations to git rm <file>, which is what we’ll do now. This will delete the file and stage the deletion for commit.
git rm mistake.txt
Notice that git status now shows a deleted event staged. Commit this change.
git commit -m "Remove mistake.txt"
There is also a git mv that will rename files and automatically stage the changes. In truth I often forget this one. Git is pretty good and recognizing renames/moves, which I add with git add.
Okay but what happens if we remove a file with rm and want it back?
rm file1.txt
“Taggart, you fool!” I hear you say. “We needed that file!”
No worries, friendo. Git knows about the file and has its contents in the depths of its archives. Because we didn’t git rm it from the working tree, we can do the following:
git restore file1.txt
Et voilà. It’s back! Git saves us from ourselves.
Going Back in Time
Since Git obviously stores files in its database, you might imagine it’s possible to go back in time to prior states—and you’d be right. That’s what git reset is for.
There’s kind of a lot to git reset, and we’ll be coming back to it. For now, let’s make a single commit that we come to regret.
echo "I wish I hadn't done this" >> file1.txt
git commit -am "I'll come to regret this"
Welp. Here we are. Maybe we don’t exactly regret this commit, but it was incomplete. We had more to do before actually committing this. We can pull this commit back (as long as we haven’t sent it anywhere) and rework it. To do so, we run git reset <commit>. The commit is a commit hash we want to revert to. All changes after that commit will then become unstaged stages.
We’ve seen the term HEAD in git log output already. This is where it comes in handy. HEAD represents the most recent commit—like the “playhead” on tape player. We can refer to the most reset commit with HEAD. But of course, we want to go back before the most recent commit. Luckily, we can add a ^ to increment the HEAD by one. So HEAD^ means the penultimate commit.
Watch what happens when we reset to it.
git reset HEAD^
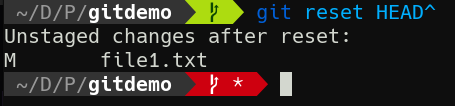
Look at that! Unstaged changes. You can use git diff to confirm that it’s our new line that’s now unstaged. We’re now free to change the file and recommit as we like.
git reset can take any commit hash as an argument. All changes since that commit will then become unstaged changes. So while we just went back 2 commits with HEAD^, we could have gone all the way back to the first commit in git log, and everything we’ve done since then would have been unstaged changes!
Going --hard
One last important note about git reset. Implicitly, we are passing the --soft argument to it, which is why any changes past our target commit become unstaged changes. If, however, you really want to go permanently back in time, you can use git reset --hard <commit>. This will revert your files to the state they were in at the time of that commit. No unstaged changes. Now you can rewrite the future.
Amending Commits
Let’s add just a bit more to our repo.
echo "Ah just kidding, I'm good with it" >> file1.txt
git commit -am "I feel good about this commit"
Ah but wait; it turns out we wanted to add something to file2.txt as part of this commit! If we have more to add to an existing commit, we can use --amend with git commit to add our new changes to the last commit. Without any other options, this will pop open the text editor, but you can use -m to provide a message on the command line.
echo "But wait! Don't leave me behind!" >> file2.txt
git add file2.txt
git commit --amend -m "I feel good about this commit"
This will add the new changes to the previous commit with the same message. We could of course have altered the message as well if we wanted.
Check for Understanding
Make some commits here, then reset them, reset them --hard, and maybe even try --amending some commits afterwards! Then when you’re ready, I’ll see you in Unit 2, where we explore alternate branches of reality.
2-1: Branches
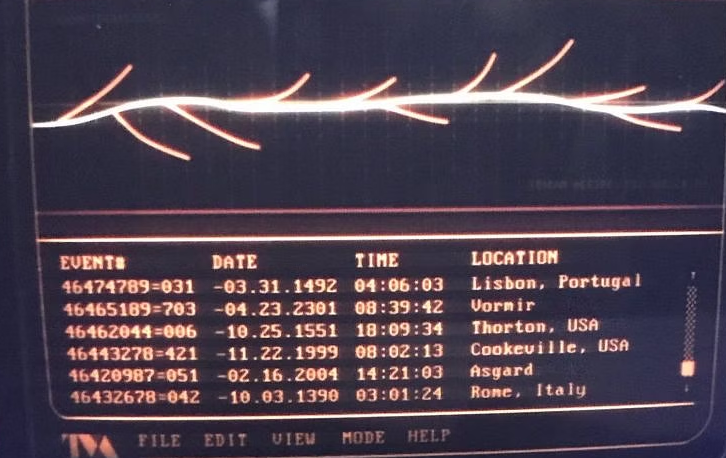
Let’s make like Loki and break the timestream
We’ve explored moving forward and backward in time, but what about…sideways?
Yes, it’s possible. With branches, we’re able to explore alternate realities of our project while maintaining the integrity of the “prime timeline.” Then, if we’re happy with the changes we’ve made in one of our alternate branches, we can bring them into the main branch. This process is known as merging.
Branching Basics
Multiple git subcommands are used when working with branches, so we’ll take this slow. To begin, let’s run git branch in our gitdemo repository.
Not a lot to see, eh? We only have one branch right now: main. We’ll soon change that.
Let’s imagine we want to play with some ideas for our project in a new file named experiment.txt. But rather than mussing our current branch with our experiment, we’ll create a new branch to do our work.
Strangely, the most common way to make a new branch is not with git branch. Instead, we use git checkout -b <branch_name>.
Wait, what?
Just trust me for a minute. Let’s run it now.
git checkout -b experiment
Now, what does git branch show you?
If you’re using our virtual machine or a Git-aware shell, your prompt will also change!
We are now in a different branch. Commits we make here will be isolated from the main branch. Let’s prove it.
echo "Let's see what this does!" > experiment.txt
git add experiment.txt
git commit -m "Add experiment.txt"
Okay so we have a new commit. You can confirm it’s there with git log if you like, but it’s there. And our working tree is clean, with no unstaged changes. That means we’re free to checkout to another branch. Let’s go back to main.
git checkout main
git branch confirms we’re in the right spot. And ls will show that…hey wait! Where’s experiment.txt?
It’s in another branch at the moment. Check git log.
It’s like our experiment never happened! Use git checkout - to switch back to the previous branch. The - works kind of like the “Back” button on a television remote.
Running ls shows our experiment.txt is back, and git log once again shows our commit. We’re in an alternate timeline!
Checking Out git checkout
The --help page for git checkout has a definition that is, well, utterly unhelpful.
Updates files in the working tree to match the version in the index or the specified tree. If no pathspec was given, git checkout will also update HEAD to set the specified branch as the current branch.
Thanks, makes perfect sense. Well, it would if you knew all of those Git internals, but this is an intro course and you shouldn’t have to. So what does git checkout really do?
Given a branch or a commit hash, git checkout will update the repo to match the state at that commit. That might sound like git reset, but there’s a very important difference: git checkout will not treat changes after a given commit (or in another branch) as though they exist.
Run git log and choose a commit hash, any commit hash. Then use it with git checkout.
First, you get a rather wordy message from Git. You’ll notice that all changes after your target commit are just…gone. Not unstaged.
Oh no; did we just destroy the future?
Nah, read that message.
The important term here is the detached HEAD. You’ve essentially entered a safe bubble (or Mirror Universe, for Doctor Strange fans) that has no impact on any branch’s real timeline. It’s pretty odd, and I almost never do this, but it is possible. The important point here is that your future changes are treated as nonexistent here in this bubble universe. But don’t worry; it’s easy to get out. As the message tells you, git switch - will work just fine, but so will git checkout -. After doing exactly that, we’re back in the present of the experiment branch, with all our work intact.
Now to switch back to main, we can no longer use git checkout -. That’ll put us back in the detached HEAD, since that was our previous location. We’ll have to specify the branch with git checkout main. And we’re back in the primary timeline.
Let’s remain here for the moment, and then talk about how to hang on to changes we’re not ready to commit while moving between branches.
2-2: Hanging Onto Changes
Let’s switch back over to our experiment branch. You can do so with either git switch or git checkout. I tend to use git checkout, but that’s because I’m a thousand years old.
Anyway, once we’re there, let’s add some content to experiment.txt
echo "Work in progress" >> experiment.txt
Now of course git status shows we have unstaged changes.
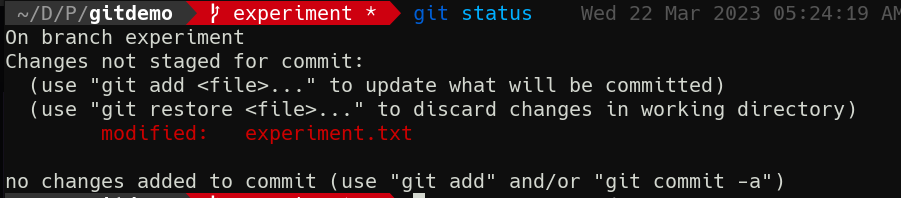
Alright well that’s enough experimenting for today! Now back to work on the main branch.
git switch main
Wait, what?!

You can’t leave with uncommitted changes! This is actually where git checkout makes sense as a metaphor. You can’t leave the store with items you didn’t pay for! Also, I love how the error message still says checkout, even when we use git switch.
We’re told we have 2 options: commit our changes or “stash” them. Stash them where? Under the floorboards? In a shoebox under the bed?
Yeah so, it turns out that git saw this problem coming. You’re working on something, you’re not ready to commit, but you need to switch branches. What should you do? Git comes with a place to store work-in-progress changes before you commit them: the stash.
The Stash
git stash --help, as usual, gives more detail than is immediately useful without context, so let’s start playing around. Try just:
git stash
You should see something like:

If you cat experiment.txt, you’ll see that the new line has disappeared. But it’s not gone forever; it’s just in the stash! Let’s bring it back.
git stash pop
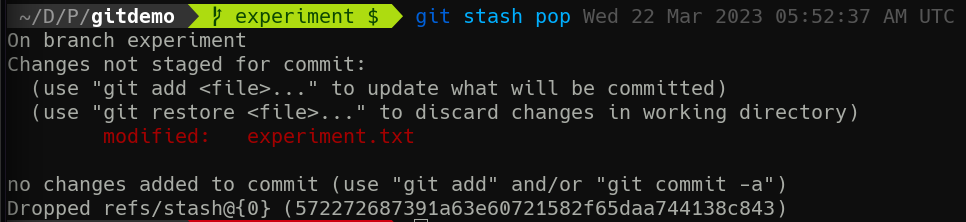
The unique part of this status message is the Dropped refs... at the bottom. This is telling us that we just removed a reference from the stash and reapplied it to our working tree.
Let’s put the changes back in the stash, but this time, we’ll do so with the push command. We’ll also provide a custom message rather than the default “WIP” one Git makes for us.
git stash push -m "Not finished with this experiment!"
Before bringing our changes back again, let’s run git stash list. This shows the existing changes in the stash. Yes, you can have more than one. To prove it, let’s move back over to main and make some unstaged changes.
git checkout main
echo "Putting the work in" >> file2.txt
git stash push -m "Working on main"
Now, try git stash list again.

See? We can have multiple changes stashed—even across branches!
Let’s head back over to experiment with git checkout -. How do we get the right stash entry back out?
git stash pop takes an optional --index argument that refers to the number inside the {} characters in git stash list. So:
git stash pop --index 1
Will reapply the proper changes to our branch. Let’s finish up here.
echo "Done...for now" >> experiment.txt
git commit -am "Finish WIP experiment"
Now, we don’t really need that other stashed change from main anymore. We can remove it from the stash with git stash drop. This command can also be used with an index number, similar to pop, if we have multiple stash entries.
And that’s it for hanging on to work in progress changes! Up next, we’ll cover joining two branches together again.
Check For Understanding
Create a new branch. Then, make some unstaged changes. Stash them and switch back to main. Move back to your new branch and reapply the changes. Switch back to main again. Repeat until you can do this without looking up the commands!
2-3: Merges
The time has come to bring our two branches together again. This usually occurs after a feature or fix has been completed and is ready to be introduced to a more primary branch. But how does git actually combine branches? This is a more complicated question than you might imagine, and in fact Git has multiple strategies it employs to merge branches, depending on the situation. But for now, we’ll focus on the basics.
Thinking back to git diff and even the notices we see after commits, it’s clear that Git can track files line-by-line. This linewise examination is how Git proceeds for plaintext files. When comparing two branches, it looks at each file with changes. If one branch has changes and the other does not, or if the changes are identical, the change is adopted. If both branches have a change at the same location and they do not match, then a merge conflict arises. We’ll address conflict resolution a bit later.
Our First Merge
If you run git merge --help, you get a lovely ASCII-art diagram of diverging branches being recombined:
      A---B---C topic
     /         \
D---E---F---G---H main
An important point in this diagram is commits F and G. Notice that commits can continue to take place on the main branch while the topic branch does its thing.
Let’s see if we can get that going with a couple of commits on main. Make sure you’re on that branch before continuing.
git switch main
echo "The work goes on" >> file1.txt
git commit -am "Continued main updates"
echo "And on and on and on" >> file2.txt
git commit -am "Even more main updates"
Cool, we now have some parallel commits to our experiment branch. Now, we’re ready for our first merge. The most basic version of the syntax is git merge <branch>, so:
git merge experiment
Since this is a commit, your editor will pop up for a commit message. We could have provided a -m, but I wanted you to see that a merge does indeed create a commit.

We get quite a bit of info following the merge. First, we’re told the merge was made using the ort strategy. That’s the default strategy, but there are others. We also see a list of files changed/added—in this case, experiment.txt was added with 3 lines.
Graphing Merges
In a world where commits can originate in multiple branches, it can be helpful to see where exactly a commit came from. There is a way to do this with git log.
First, try git log --graph. You’ll see something like this:
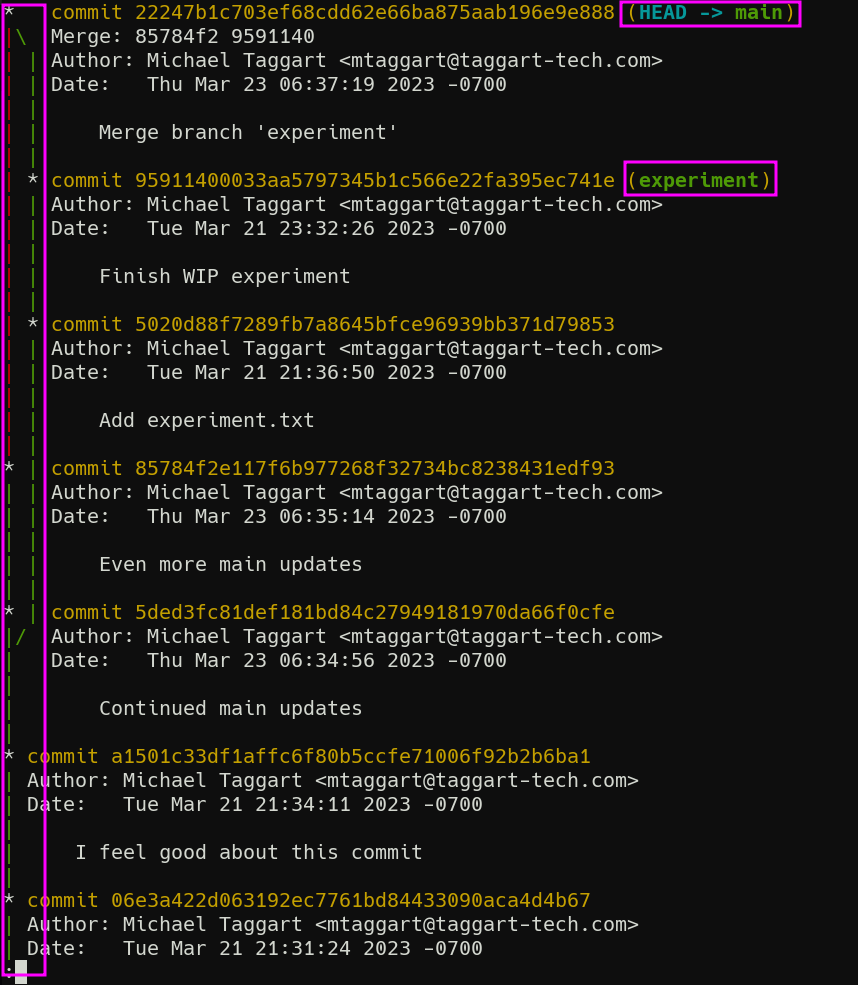
I’ve highlighted the branch diagram, as well as the most recent commit on each branch which identifies the branch name. Although simplistic, this little diagram can tell us a lot about the history of our repo, and where a commit came from. But it is kind of a lot of text. Luckily, we can abbreviate it.
git log --graph --oneline
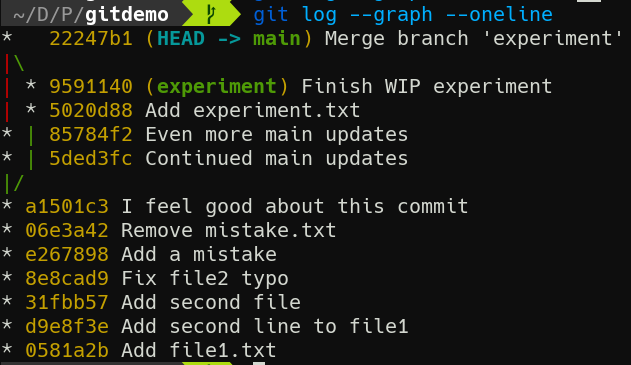
Much easier to read if you ask me.
git log has several additional options to help make the review process easier, like --limit, --since, and --until. Everyone has their preferences for how to use git log. Take some time to practice and find yours.
Squashing
For the next bit, it’s time once again for a new branch. Let’s make the phase2 branch and switch to it. This time we’ll use git switch instead of git checkout, with the -c option, to create a new branch.
git switch -c phase2
Now, time for some commits! Here’s a set of commands to quickly generate some commits.
touch phase2.txt
git add phase2.txt
git commit -m "Add phase2.txt"
bash -c 'for i in $(seq 10); do echo "Step $i" >> phase2.txt; git commit -am "Step $i"; done'
Now let’s switch back to main.
But before we merge these commits, let’s pause for a moment. Do we really need all those tiny commits in this merge? Do we need to preserve every single one? Or would it be enough to represent the work in phase2 as a single entity, and merge that.
We can do that with the --squash option. This will compress the many commits into change, apply it to the current working tree, but not execute the commit. You still need to review the changes first, and then you can make the commit.
git merge --squash phase2
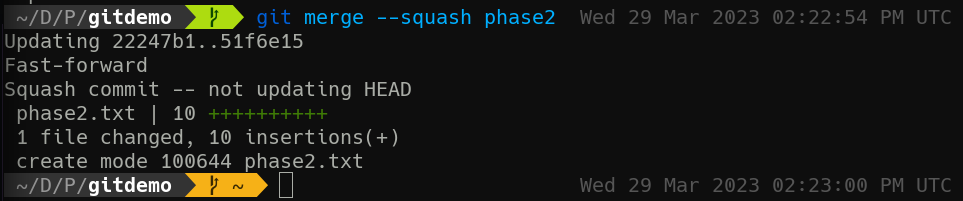
You can see here that phase2.txt, all 10 lines of it, is added. However we’re also told that as this is a “squash commit,” HEAD will not be updated. That’s why my Git status indicator turns gold, indicating I have staged changes. git status will show I have a new file staged. From here, as long as I’m happy with the results of the merge, I’m ready to commit.
git commit -m "Merge phase2"
Now, git log --graph --oneline will only show a single commit for all that effort. It won’t even show a separate branch! This might be what you want, but it might not. Also note that if you switch over to the phase2 branch, the original commits are preserved in that branch’s logs. You now have slightly different versions of history.
Personally, I don’t like to squash commits unless it would be very messy (dozens of commits clogging up the log) to do otherwise. I prefer to be able to see exactly what got merged in my primary branch.
And now that we’re done with the phase2 branch, we can delete it.
git branch -D phase2
Now that’s how merges work when everything’s going well. Up next, we’ll cover what happens when things go wrong.
2-4: When Merges Go Wrong
Two objects cannot occupy the same point in space and time, or so say Newtonian physics. While quantum reality may get a little fuzzier on those questions, Git commits do not. During a merge, commits that have different changes in the same file, on the same line results in merge conflicts.
Conflicts are uncommon, but also unavoidable when you have a large number of branches or developers for the same project. Sooner or later, somebody will make a change to a file in direct contradiction to somebody else’s change.
Git has a process for resolving these conflicts, but it takes getting used to. Let’s get ourselves into some trouble!
git switch -c trouble
echo "This line goes out to the rebels!" >> file1.txt
echo "This line goes out to the dreamers!" >> file2.txt
git commit -am "Who cares about main; I'm doing my own thing"
git switch main
echo "I'm definitely keeping this" >> file1.txt
git commit -am "Add line to file1 that I'm definitely keeping"
git merge trouble
Aaaand conflict.

Uh oh. What have we done?!
First, review git status to understand the current state of the working tree.
Conflict Syntax
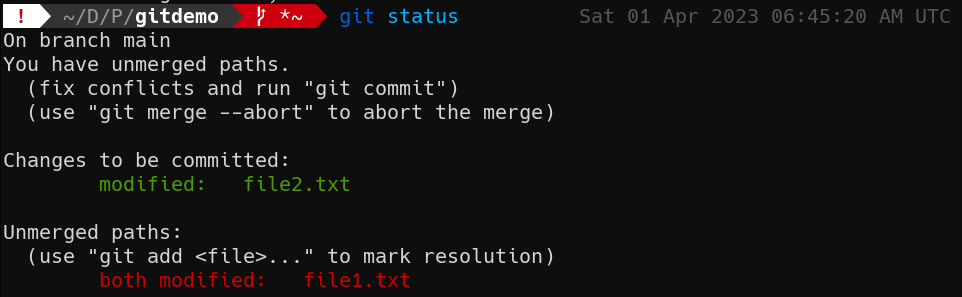
There’s quite a bit of information here. First, we’re told the merge did not complete. If we want to back out entirely, we can! We can run git merge --abort, and we’ll go back to our clean main, no harm no foul. But what about that change in file2.txt? What if we actually want that? We can’t just ignore this problem; we need to confront it head-on. For the first time in this course, I’m going to ask you to use a text editor. Any editor will do, but use it to open file1.txt.
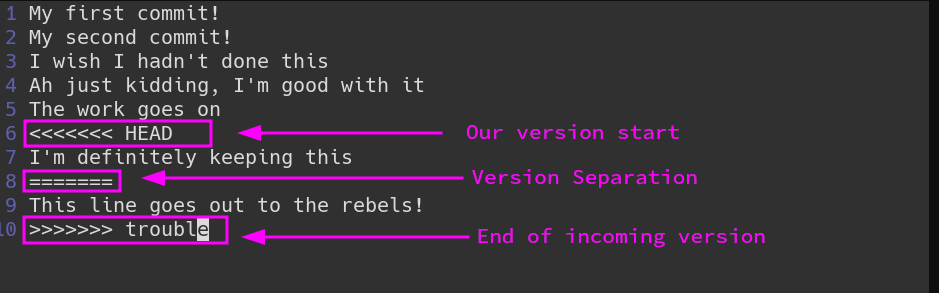
What da—Git modified our file for us! Yeah, this is one of the more intrusive Git operations. When there’s a conflict in a file, Git will add lines indicating where conflicting sections begin an end. This will always start with the <<<<<<< HEAD marker to indicate the current state. Beneath that are all the lines that are currently present in the branch you’re on. Then comes ======= to show the branch separation. Then comes all the lines that differ, until the >>>>>>> and branch name.
Resolving Conflicts
To sort this mess out, you need to decide which lines stay and which lines go. This is a manual process. There are tools that can make it a little easier, and we’ll discuss them later, but I want you to be comfortable with how Git presents its raw data.
I think we want to keep the current branch’s version, so let’s delete not only the Git markings, but also the incoming line from trouble. The file should look like this when done:
My first commit!
My second commit!
I wish I hadn't done this
Ah just kidding, I'm good with it
The work goes on
I'm definitely keeping this
Save and quit.
We now have to re-stage file1.txt and commit our changes to finish the merge.
git add file1.txt
git merge --continue
When we do git merge --continue, you’ll notice a text editor pops up. You can of course pass -m with a message to bypass this. But hey! Our working tree is clean again!
Run git log --oneline --graph to see the fruits of your labor. Look at those pretty branches.
As always, there is a great deal more depth to the topic of conflict resolution, but this is where to start. You’ll now have what you need to fix these issue when they arise.
Check For Understanding
What happens if I make commits to the same file in 2 different branches, but on different lines? Maybe something to test…
2-5: More Commit Sorcery
Before we finish with the unit on Git mechanics, I want to discuss two other invaluable ways of manipulating commits: cherry-pick and rebase.
For this exploration, let’s begin by making two branches off of main.
git switch -c longterm
git switch -c shortterm
git switch main
And back to main. The idea here is we have two separate efforts in our project: a long-term project that has multiple goals and features to add, running in parallel to main for some time; and a short-term project that has a single objective and will soon be merged back into main.
Cherry Picking
But what if one of these branches ends up doing something cool that another branch needs? For example, what if the people working on longterm fix an error that affects every other branch, but nobody’s quite ready to merge longterm in yet? How can we get that particular fix without getting everything else?
If we’ve been disciplined with our commits, we can use git cherry-pick. This will take a single commit hash and apply it to the current working tree without any other changes before or after. Let’s see it in action by making a bunch of commits in longterm.
git switch longterm
echo "The start of something great" > newfeature.txt
git add newfeature.txt
git commit -m "Start new feature"
echo "Continued progress on new feature" >> newfeature.txt
git commit -am "More new feature work"
sed -i "s/Step 1/Step 0\nStep 1/m" phase2.txt
git commit -am "How did we forget Step 0?!"
If you wanna know more about that
sedcommand, you might like our Intro to Regular Expressions Course!
So, alongside the ongoing work on newfeature.txt, the folks working on longterm have fixed a problem in phase2.txt! How did we forget Step 0?! Ah well, problem solved. Of course, we aren’t yet ready to merge this whole thing into main. Instead, we can use git cherry-pick to apply just this commit.
First, grab the commit hash for the most recent commit:
git log --oneline -n 1
Then, head over to main and pick that cherry!
git switch main
git cherry-pick <commit hash>
You’ll see something like:

Looking at the contents of the repo, you won’t see newfeature.txt! But phase2.txt has Step 0 now! This is yet another reason why being very intentional with your commits pays dividends. You never know when you might have to pick one off the tree.
git cherry-pickcan actually take as many commit hashes in order as you give it, but I would be very careful using it with more than one at at time.
All Your Rebase
Now let’s head over to shortterm and add some work.
git switch shortterm
git mv experiment.txt feature.txt
git commit -m "Stabilizing experimental feature"
echo "Now working as intended" >> feature.txt
git commit -am "Stable feature"
This branch is now behind main thanks to our cherry-picked commit. It is also ahead of main with the changes introduced here.
At this point, we need to learn a new git log trick. It turns out you can give git log multiple branch names, and it will include all commits reachable from all the listed branches. So git log main shortterm --oneline --graph results in:
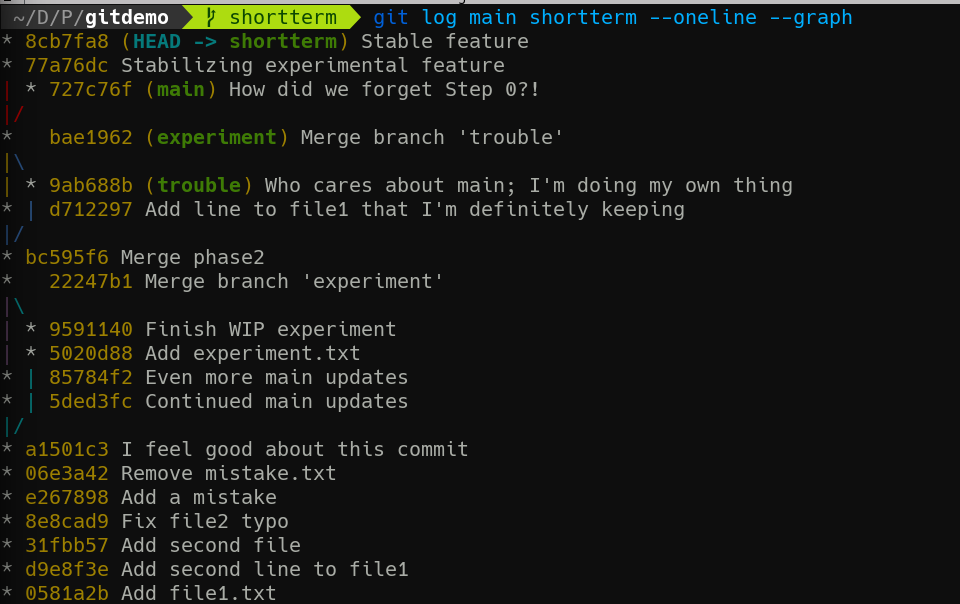
Note that the leftmost line is always our current branch, which is why main looks like a weird spar at the top there.
At this point, we have two options: we can merge main into shortterm, which will work fine, but may not be the story we want to tell, since we’ll later be merging shortterm back to main. If we want shortterm to have its commits appear after the work in main, we have another option: git rebase will take our branch’s commits and apply them after the new base, creating a single cohesive history. Try it!
git rebase main
Rerun git log main shortterm --oneline --graph. It looks different!
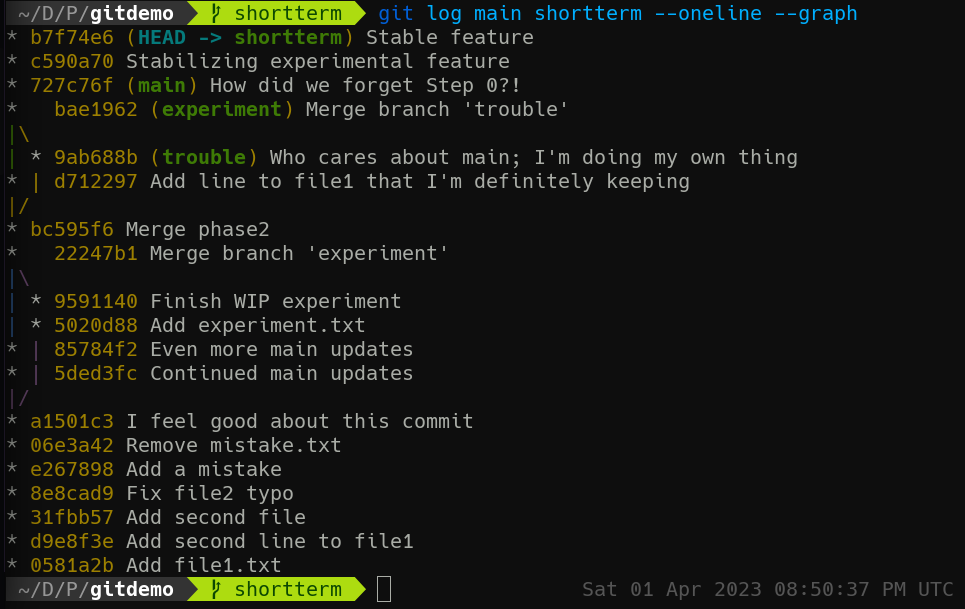
Now shortterm actually includes the Step 0 fix without a merge. This can be a cleaner way to handle updating feature branches rather than constant multidirectional merging. But! if you want to represent the actual order of when commits took place, merges may be more appropriate.
End of Unit 2
Nice job! You’ve made it through the most complex section of this course, covering basic Git mechanics. The topics in this Unit require practice to truly understand and internalize, and I encourage you to do so. Rebasing in particular tends to confuse people, so make sure to get comfortable with what happens during a rebase as opposed to a merge. Try explaining it in writing in your own words!
Then, we’ll move off a single system in the next Unit on collaborating with others!
3-1: Remotes
This whole time, we’ve been pretending to be working with a team on different features and branches in our project. But in reality, doing so means coordinating respositories across multiple computers. And while we haven’t yet done so with our exploration of Git, this was absolutely its design intention. This where remotes come in.
Remotes
All the way back at the beginning of the course, I asked you to fork this repo on Codeberg and then clone your copy of the repo. And then we never mentioned those two operations again. Now I’d like you to navigate to that folder on your computer in your terminal, and run the following command:
cat .git/config
Now head over to our gitdemo repo that we’ve been working on this whole time. Run the same command. See any differences?
The cloned repo has several sections not present in gitdemo. For starters, a [remote "origin"] that seems to indicate where the repo came from in the first place.
Remotes are copies of the repository on another computer. Often, this is on a Git hosting service like GitHub/Codeberg (there are others, btw). Git will connect to this remote copy of the repo and pull new changes present there but missing locally, and push new changes that are local but yet to be sent to the remote.
When working with a team, usually a single remote is defined as the single source of truth for a project, and commits to the remote’s main branch are carefully managed. Different hosting services offer different mechanisms for reviewing and approving changes, which we’ll talk about shortly.
But first, we need to discuss a little more about how remotes work with our local repo. To make this clearer, run git branch -a in your fork of this course repo.
The -a option shows all branches, not just locals. With this option, you see remotes/origin entries as well. origin is Git’s name for the default remote, and is assigned to a source repo when we clone it.
You can have more than one remote, for example a backup, or an upstream version of the project. But most repos hosted remotely have just the one.
Git Hosts
Speaking of hosts, while GitHub is by far the most well-known, there are several other choices for Git hosting. Obviously, we’re using Codeberg for this course. Codeberg is the flagship instance of Forgejo (“for-JAY-ho”), an open source Git-based code forge. It is entirely possible to self-host your own instance, or find another one.
I’ll also mention Tangled, an interesting experiment where ATProto, the protocol powering the Bluesky social network, is used to host and track Git commits.
Remotes In Action
We’ve seen git clone do its thing, but there’s actually quite a bit going on under the hood. To demonstrate, we’re going to add a remote to gitdemo manually. To do this, you’ll need a Codeberg account, but you already have one of those!
While logged in, head to https://codeberg.org/repo/create. We’re making a new repo on Codeberg. Call it gitdemo. You can make it private if you like. Don’t bother adding a README or anything else. Your options should look something like this:
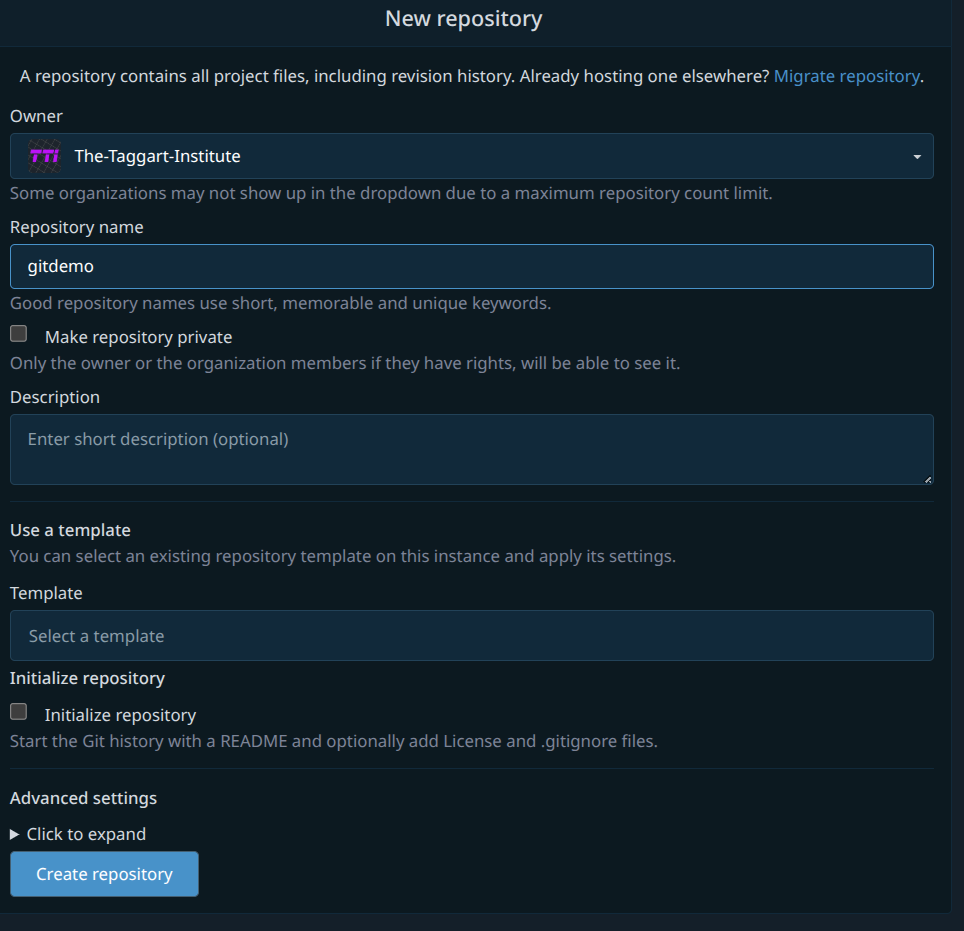
Create that thing! Codeberg will then helpfully give you some pointers on how to connect a local repo to it. But don’t jump ahead; we’re doing it step-by-step.
Step 1: Add a Remote
Get your Terminal into the gitdemo folder. Here’s where we add a remote manually.
git remote add origin git@codeberg.org:your-username/gitdemo.git
We’ve already created a main branch, so we’re all set there.
If you cat .git/config now, you’ll see a remote set up!
Step 2: Connect Local main to origin/main
Right now, Git doesn’t know that your local main has anything to do with main on Codeberg. Well in fact, right now Codeberg’s main doesn’t exist. Let’s fix that.
git push -u origin main
And there’s git push! This does 2 things: it creates a main branch on Codeberg by uploading our local commits; and it sets up our local main to track the new main on Codeberg. You can confirm this by examining .git/config. There’s now a new [branch "main"] section that points to origin as its remote.
Now that we have a remote, let’s demonstrate merging changes from it to our local copy—also known as a pull.
Making Remote Changes
The repo is looking a little sparse. We should at least have some landing text, which we can provide by adding a README.md file.
Click the “New file” button at the top of the repo page.
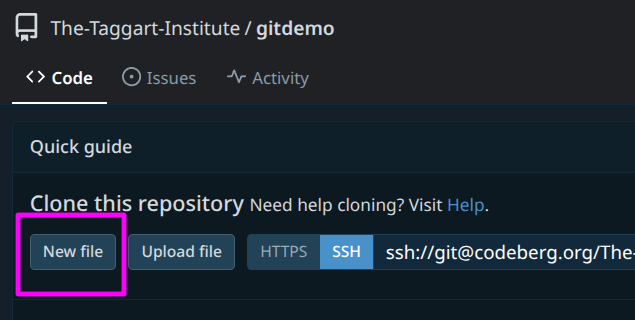
Call it README.md and add some text to the file.
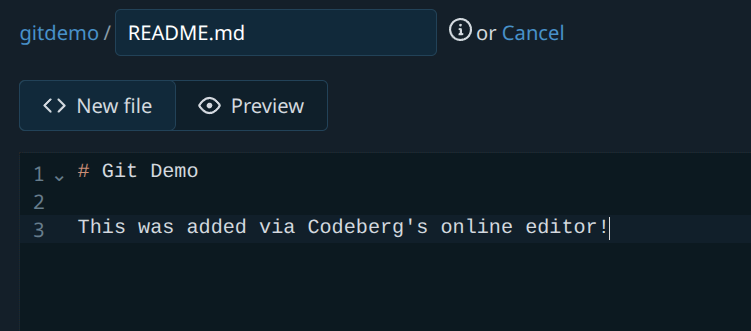
Now, commit your changes by adding a commit message.
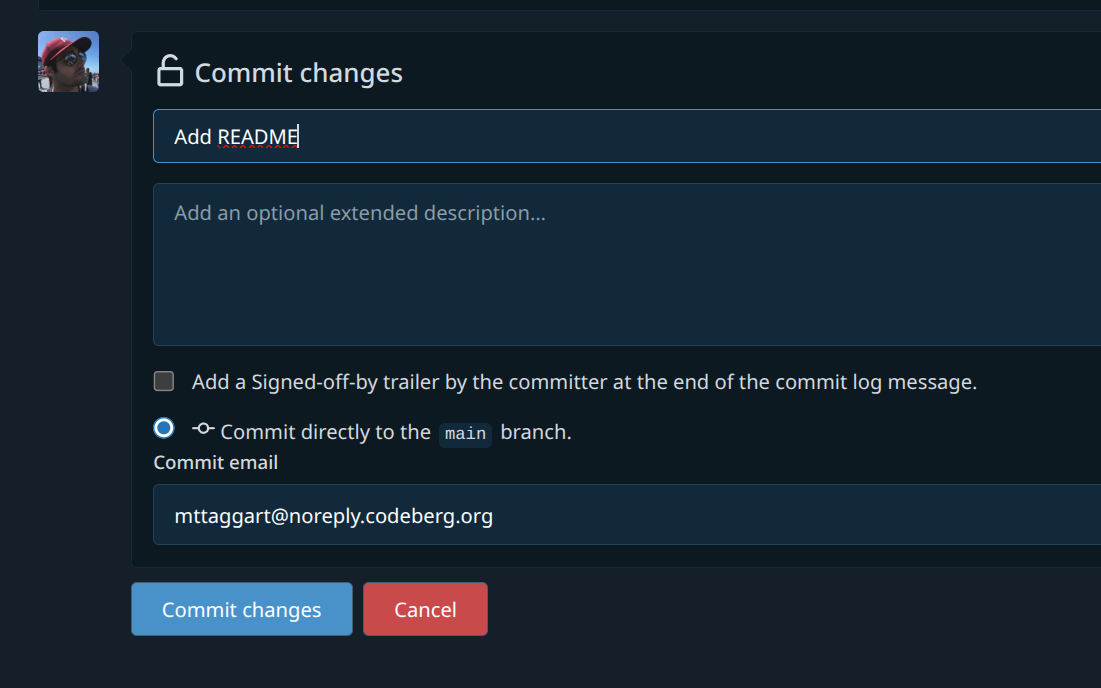
Hey, now there’s a README.md on the Codeberg version of main. But our local is missing it.
Fetching Remote Changes
You might think the solution is git pull, and you’re right, but slow down! git pull, much like git clone, is actually multiple Git commands disguised in a trenchcoat.
First, let’s run git status to see how things stand.
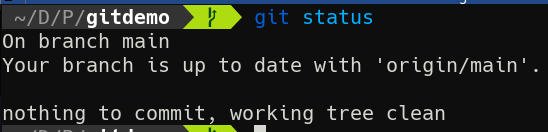
Now that we have a remote, git status provides new information. But we know it’s wrong! Our branch is not up to date with Codeberg! What’s up?
This is important: Git does not fetch remote changes automatically. But we can. Do so with git fetch. Now run git status again.

Aha! Now it knows.
While it tells us we can run git pull, here’s a secret: git pull is git fetch + git merge <remote branch>.
So at this point, if you run git merge origin/main, you’ll perform exactly what git pull would have done.

Nobody actually does this; git pull is way more convenient. But I wanted you to understand what was happening underneath. Because Git maintains a local copy of the remote branch, it’s available for merging after a fetch. Pulling is just a combination of those two operations.
Okay, that’ll do it for remotes. Up next, we’ll talk about how to handle multiple remote branches and merging changes to main.
Check For Understanding
If pull is a combination of fetch and merge, what happens on the remote during git push?
3-2: Pull Requests
Our project is up and running on Codeberg, whoo! We’re now able to collaborate with our team members across the world, keeping our locals updated with the latest changes in the authoritative source.
But imagine this situation: you and a colleague are both working on the same file. They push a change to main that is in direct contradiction to what you’re doing. Then you go to pull. Suddenly, a merge conflict through no fault of your own!
Or even worse, you push your changes to main and suddenly now the official repo has a merge conflict. This is no way to manage changes.
Enter Pull Requests. These are a mechanism in GitHub, Codeberg, and other repo hosting services to handle merges with review, discussion, and accountability. Here’s the basic process:
- A contributor makes a push to a remote branch other than the merge target. The merge target can be
main, but doesn’t have to be. - A pull request is opened, proposing a merge from the branch that just got pushed to the target branch.
- At this point, the repo hosting service will do a few things: perform a preflight on the merge to see if there are conflicts; open a discussion thread about the merge; and launch any automated tasks that have been configured by the team.
- After the merge has been approved, the merge is committed to the target branch. The reviewers then have the option to close the merged branch.
It makes more sense in practice. Let’s request a pull!
Pull Request Example
Don’t worry; you don’t need to find a friend for this next part. You can play the role of multiple contributors for the purposes of this lesson.
Let’s start back in gitdemo by creating a new branch for our “colleague.”
git switch -c colleague
Time to make a new change!
echo "New work from a new teammate" >> file1.txt
git commit -am "New work on file1"
Now we need to push this to Codeberg. Just like before, there is no colleague branch there yet, so we need to add it with the -u option for git push.
git push -u origin colleague
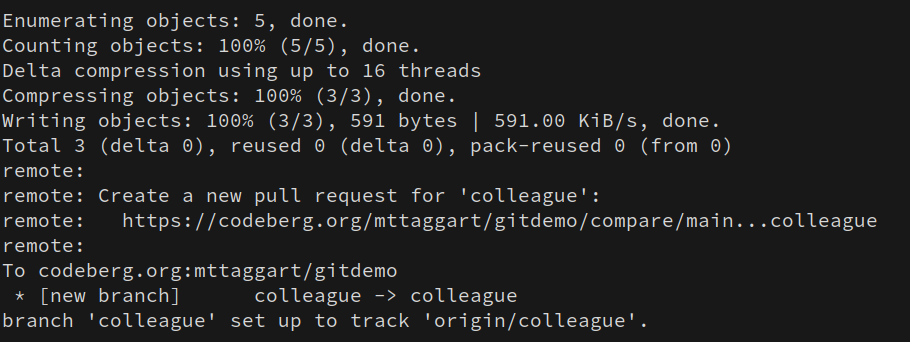
Oh hey look at that; Codeberg is telling us right in the terminal that we can open a pull request. Good idea, Codeberg! Follow that link or head to your repo on Codeberg.
If you go soon after the push, you’ll see a notification on the repo’s main page about the push, with a handy link to make the PR. Do it!

Otherwise, head to “Pull Requests” and click the “New Pull Request” button.
When using the prompts, the new PR form is pre-filled out for you. Opening a PR manually means you need to set up the base and target branches. Our base in this case is main, compared with colleague.
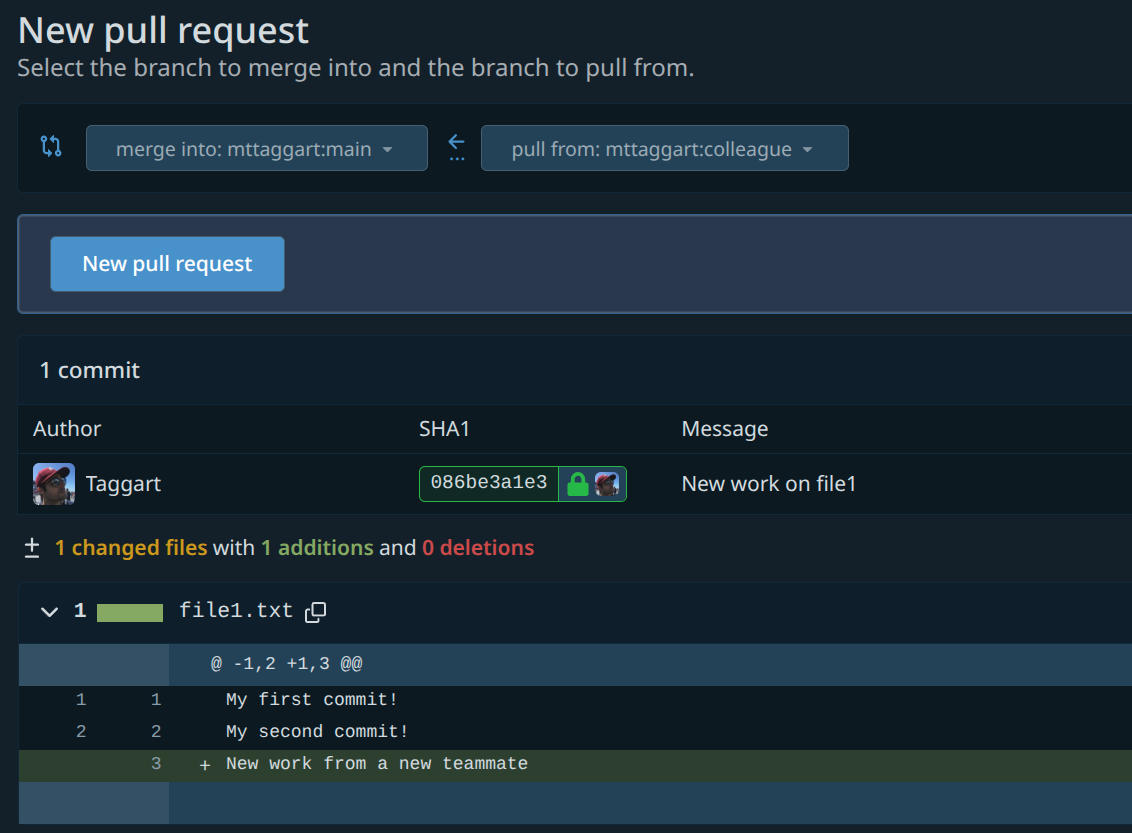
Codeberg should tell us that everything looks good and we can create the PR. Do so now.
PR Process
At this point, agreed-upon procedures for change management take over. Some can be automated, but others will be matters of policy. Discussion about big changes should take place in the thread opened for the PR, until all principals agree to the change.
In this case, it’s a committee of one, so let’s go ahead and merge.
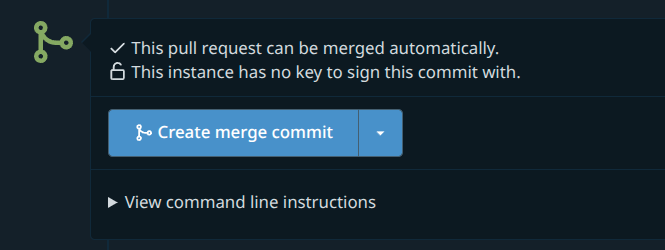
Once done, you can delete the colleague branch on Codeberg.
Now back in the terminal, let’s switch to main and get our new changes.
git switch main
git pull
And now the new changes are in our main local branch! A review of git log --oneline --graph shows the PR represented in both the remote and local colleague branches.

That’s it for the mechanics of PRs, but the practice can get a little more complicated. This next section is a bit of wisdom I’ve picked up along the way about how to do PRs well.
PR Best Practices
Branch Strategies
Generally speaking, branches are either long-term or short-term. Long-term branches can be for specific versions, development efforts, or even for the ongoing work of specific teams. PRs can be opened from individual devs to the team branch, or to those specific version branches.
Short-term branches are useful for specific features or bugfixes. PRs can be opened from them to the appropriate long-term branches.
PR Approvals
In my experience, it’s best if one or a very small group of people have final say on PR approvals per branch. You want to strike a balance between discussion, accountability, and a timely decision process. The bigger the change, the more important discussion around the change impacts will be.
Automated Processes
Although outside the scope of this course, I encourage you to explore automated processes that would be appropriate for your project. That could mean automated builds or testing such that your tools are doing all possible checks to make sure the changes won’t break anything. Then, automated deployment can get your changes published as quickly as possible. This is known as Continuous Integration/Continuous Development, or CI/CD.
Git Tags and Releases
One last Git trick before we get out of here: Git has a built-in tool for version management: tags!
Tags are metadata we can add to commits to indicate versioning. These tags are reviewable in Codeberg and can be attached to Releases, to indicate significant updates available for users.
Versioning
There are many version numbering strategies, but I tend to subscribe to SemVer, or Semantic Versioning. The details can be negotiable, but big picture we have 3 parts to the version number, like 1.2.3.
Making a Tag and Release
Let’s tag a version and release it!
We start on main and create a tag. This is a pre-release version, so we’ll do 0.1.0.
git tag -a 0.1.0 -m "Initial release"
This adds (-a) with a message (-m) of “Initial release.”
Now, to send this tag to Codeberg, there is a specific push syntax:
git push origin 0.1.0
And just like that, we have a new tag available! You can see this in the bottom right of the repo main page, or at /tags.

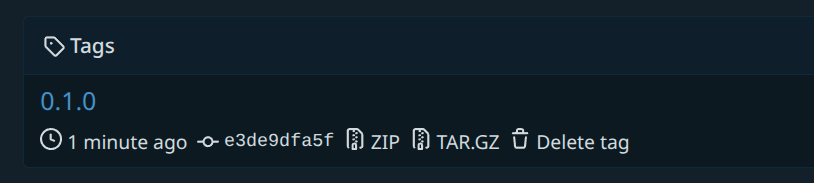
Releases are public announcements about a version of your project, usually accompanied by build artifacts for download. By default, releases are not enabled for Codeberg repos, but can be in the repo settings in Units → Overview:
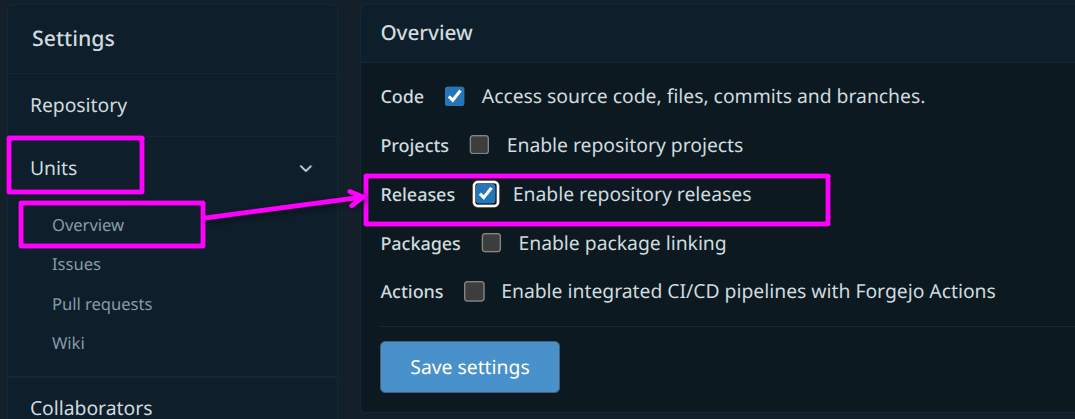
Now you can click on the “Releases” tab, and “New release.”

On the next form, you can choose an existing tag or make a new one. Good thing we know how to make tags now! You can then add details about the release, as well as upload any files you want users to be able to download (like compiled binaries).
Once done, we have ourselves a release!
I tend to only add tags and create releases from main to keep things clean. Other branches eventually feed into that branch for new versions, but other projects can take advantage of other structures.
And that’s it for PRs! Moving into the final Unit, we’ll discuss publishing documentation using Codeberg and MDBook—kinda what we’ve been building to this whole time!
4-1: Publishing Concepts
For this Unit, we are leaving our trusty gitdemo behind. Thank you for your service, gitdemo, but where we’re going, you can’t follow.
This Unit is the reason you forked the creating-with-git repo lo those many Units ago. This is where we start to build something legitimately useful: a documentation site.
Git and Documentation
While Git is most famous for work with projects made of programming languages, we’ve demonstrated in this course that it is just as capable at managing projects of human language—provided the files are plaintext. That’s why we mentioned Markdown back at the beginning.
It also happens to be how this site is built! Every page you see rendered here is the result of a Markdown file being processed by the MDBook tool into a static HTML page, which we can serve a number of different ways.
Git serves as a powerful tool for managing documentation—and not just for software projects. All too often, important institutional knowledge lies withering in some old Wiki, or in knowledge systems (cough Confluence cough) that nobody uses because nobody likes the interface. These entropic knowledgebases are dangerous to organizations. Instead, I recommend a tool that is lightweight, flexible, and has stood the test of time.
For input data, that’s plaintext in the form of plaintext (Markdown). For management, Git fits that bill nicely. And for output, nothing makes more sense than HTML. With decades under their belt, you can rely on the knowledge stored in Git repos to be available and updateable for years to come.
Codeberg has a Wiki option, but no: we’re talking about how to make knowledge accessible and transferable. We can’t rely on any single platform’s features. Instead, we’re going to use the open source MDBook to convert a repo of Markdown files—y’know, like this one—into a searchable website of documentation.
😮
That’s right: all along, this site and the repo it’s based on has been a secret template for your own documentation project.
Repo Preparation
Everything we do from here on out should take place in your fork of creating-with-git.
In the next lesson, we’re going to deploy our docs site! If you followed the instructions in the Introduction, you already have MDBook working—in fact, you may be reading this site on the local version of the docs. If not, head back to that page and make sure to run the commands listed there to install it.
In the next chapter, we’re going to use Codeberg’s Pages feature to publish our docs as a static site. This will mean you need to shut down mdbook serve if you’re running it from your local fork. You’re more than welcome to keep running it from the Taggart Institute copy of the repo, or referring to the docs at cwg.taggartinstitute.org.
See you there!
4-2: Codeberg Pages
The MDBook tool that we’re using can generate websites for any platform, but since we’re on Codeberg anyhow, we can take advantage of Codeberg Pages. This feature lets you host static websites directly from a Codeberg Repo. There are technically two ways to use this feature.
There are 2 ways to use Codeberg Pages: the webhooks method and the legacy method. As of this writing, the legacy method is the only way to use a custom domain. Either way though, we’ll need to create a new branch of our repo for our published data.
Branch Setup
In your local copy of your creating-with-git fork, make a new branch for our Pages deployment.
git switch -c pages
What comes next is going to feel very uncomfortable. We’re going to delete everything tracked by Git. That’s because the structure of the pages branch will be fundamentally different from main. So we start with a clean slate.
Warning
Make sure you enter these commands exactly as written here! I don’t want you to accidentally destroy data somewhere else on your system!
Inside the repo folder, run:
rm -rf ./*
rm .*
git add -A
git commit -m "Clean repo for pages"
Then, as we’ve done before, push this new branch to Codeberg.
git push -u origin pages
Scary I know, but we’re about to see all our stuff again. Let’s switch back to the main branch.
git switch -
There, see? All our stuff is back.
Submodule Setup
It’s time to introduce a brand new Git concept: Submodules. Repos can have subordinate repos as ad-hoc dependencies. This is extremely valuable when you have an overarching project that uses code from multiple smaller projects. Instead of manually updating each one, Git can keep the submodules up to date.
We’re going use this feature to make updating the pages branch really easy. Since pages no longer has our source material, we’re going to simply copy the built book data from our build folder to the pages submodule, which will look like just another folder in our repo. To accomplish this, we add the pages branch of this repo as a submodule in main. It’s a little wacky, but trust me: it makes this process incredibly simple.
You may have noticed that the repo you forked has a pages folder in it. And in fact, if you look at that folder on Codeberg, it looks kind of strange. There appears to be a specific commit next to its listing. This folder is a submodule. However, in your version of the repo, the folder is empty.
That’s because by default, Git does not initialize submodules when you clone a repository. You can pass --recurse-submodules to do so, but we didn’t want to in this case.
Now it’s time to use that folder though. I want you to understand what’s going on with submodules, because they can get a little tricky. First, look at the current entry in .gitmodules:
cat .gitmodules
This is the definition file for all defined submodules. You should see this:
[submodule "pages"]
        path = pages
        url = git@codeberg.org:The-Taggart-Institute/creating-with-git
        branch = pages
Pretty clear, right? The submodule pulls from the TTI repo for this course, using the pages branch.
But…that’s not really what you want. You want to use your pages branch, not ours. So we need to modify that file. git submodule set-url will sort you out.
git submodule set-url pages git@codeberg.org:USERNAME/REPO
Obviously replace USERNAME and REPO with the appropriate values there. The .gitmodules entry will reflect the change.
But the pages folder is still empty. We need to initialize the submodule (tell Git to care about it), and then update it to match its remote. This is a two-command process.
git submodule init
git submodule update
You will see what looks like cloning behavior. The pages folder is still empty, but we’ll soon fix that. One last piece of housekeeping. When we ran git submodule update, the submodule was checked out to a new, detached HEAD. We need to set it to pages by moving into the directory and using git switch.
cd pages
git switch pages
cd ..
At this point, git status will tell you that .gitmodules has changed. Commit that change to clean the repo.
git commit -am "Update submodule URL"
Note
The submodule commands we just ran are because you cloned a repo with defined submodules. If you were doing this completely from scratch on your repo, you’d add a brand new submodule in
main, like so:git submodule add -b pages git@codeberg.org:USERNAME/REPO pages
Okay, that’s the submodule setup. Time to publish.
Publishing
Let’s build the site.
mdbook build
You’ll notice that there is book folder in your repo. That’s where your built site is! This folder has actually been there for a while now, since that’s where mdbook serve was generating our local site. But Git was ignoring it based on an entry in the repo’s .gitignore file.
With the site built, we can copy the contents from book to pages to populate our submodule/branch. We would then want to change into the pages directory, commit the changes, push, and come back out.
Every. Time.
So that’s what scripting is for. We’d want a publish.sh to handle this for us.
Make publish.sh in your repo. It will look like:
#!/usr/bin/env bash
PAGES_DIR=./pages
BOOK_DIR=./book
pubdate=$(date -Iseconds)
echo "[+] Building book for $pubdate"
mdbook build
cd $BOOK_DIR
cp -R ./* $PAGES_DIR
cd $PAGES_DIR
git add -A
git commit -m "Publish: $pubdate"
git push
cd ..
git commit -am "Update: $pubdate"
git push
Save this file. Then make it executable by running chmod +x publish.sh. Now of course we’ll add it:
git add publish.sh
git commit -m "Add publish script"
Let’s do a test run! Make some changes to your Markdown files, then run:
./publish.sh
If all goes well, your content should be pushed to Codeberg and in a minute or two, your site will be live at https://your-account-name.codeberg.page/your-repo-name.
Note
We’ve done the non-webhook version of this because it’s the most flexible. Additionally, if you want to use a custom domain, it’s the only option. Please see the Codeberg Documentation on adding a custom domain. It’s not too tricky; just a
CNAMEDNS record and a.domainsfile in thepagesbranch.
Believe it or not, that’s it! You’ve not only published your documentation, but you’ve finished this course! Well done! Now all that’s left is the Exhibition Of Mastery.
5-1: Exhibition of Mastery
It’s time to take what you’ve practiced here and prove you understand it. Luckily, this course’s EoM is about as straightforward as possible. Your mission, should you choose to accept it:
Take this repo and reshape it to your purposes. Use the MDBook structure to produce documentation for anything you like: a hobby, a process at work—heck, it could even be a family cookbook. But use Git to make and track changes, maintain branches, and publish the result as a searchable website. Then, share your results with us on The Taggart Institute!
Thank You!
I hope you’ve enjoyed this course. Thank you for your time, attention, and hard work. Well done on making it all the way through.
- Michael Taggart